> ## Documentation Index
> Fetch the complete documentation index at: https://wb-21fd5541-mintlify-8476678c.mintlify.site/llms.txt
> Use this file to discover all available pages before exploring further.
> タグを使って、コレクションや、コレクション内の artifact バージョンを整理します。 Python SDK または W&B App UI でタグを追加、削除、編集できます。
# タグでバージョンを整理する
タグを作成して追加し、Registry 内のコレクションや、そのコレクション内の artifact バージョンを整理します。W\&B App UI または W\&B Python SDK を使用して、コレクションまたは artifact バージョンにタグを追加、変更、表示、削除できます。
**タグとエイリアスの使い分け**
特定の artifact バージョンを一意に参照する必要がある場合は、エイリアスを使用します。たとえば、`artifact_name:alias` が常に単一の特定バージョンを指すようにするには、`production` や `latest` のようなエイリアスを使用します。
グループ化や検索をより柔軟に行いたい場合は、タグを使用します。タグは、複数のバージョンやコレクションで同じラベルを共有でき、特定の識別子に関連付けられるバージョンが 1 つだけである保証が不要な場合に適しています。
## コレクションにタグを追加する
W\&B App UI または Python SDK を使用して、コレクションにタグを追加します。
W\&B App UI を使用して、コレクションにタグを追加します。
1. [W\&B Registry](https://wandb.ai/registry) にアクセスします。
2. レジストリカードをクリックします。
3. コレクション名の横にある **View details** をクリックします。
4. コレクションカード内で、**Tags** フィールドの横にあるプラスアイコン (**+**) をクリックし、タグ名を入力します。
5. キーボードの **Enter** キーを押します。
```python theme={null}
import wandb
COLLECTION_TYPE = ""
REGISTRY_NAME = ""
COLLECTION_NAME = ""
full_name = f"wandb-registry-{REGISTRY_NAME}/{COLLECTION_NAME}"
collection = wandb.Api().artifact_collection(
type_name = COLLECTION_TYPE,
name = full_name
)
collection.tags = ["your-tag"]
collection.save()
```
## コレクションに属するタグを更新する
タグは、再代入するか、`tags` 属性を変更することでプログラムから更新できます。W\&B では、`tags` 属性をインプレースで変更するのではなく、再代入することを推奨しています。これは Python のベストプラクティスでもあります。
たとえば、次の code snippet は、再代入によってリストを更新する一般的な方法を示しています。簡潔にするため、コード例は [コレクションにタグを追加するセクション](#add-a-tag-to-a-collection) の続きになっています。
```python theme={null}
collection.tags = [*collection.tags, "new-tag", "other-tag"]
collection.tags = collection.tags + ["new-tag", "other-tag"]
collection.tags = set(collection.tags) - set(tags_to_delete)
collection.tags = [] # すべてのタグを削除する
```
次の code snippet は、インプレースミューテーションを使用してartifactバージョンに属するタグを更新する方法を示しています。
```python theme={null}
collection.tags += ["new-tag", "other-tag"]
collection.tags.append("new-tag")
collection.tags.extend(["new-tag", "other-tag"])
collection.tags[:] = ["new-tag", "other-tag"]
collection.tags.remove("existing-tag")
collection.tags.pop()
collection.tags.clear()
```
## コレクションに追加されたタグを表示する
W\&B App UI を使用して、コレクションに追加されたタグを表示します。
1. [W\&B Registry](https://wandb.ai/registry) にアクセスします。
2. レジストリカードをクリックします。
3. コレクションの名の横にある **View details** をクリックします。
コレクションに 1 つ以上のタグがある場合、それらのタグはコレクションカード内の **Tags** フィールドの横で確認できます。
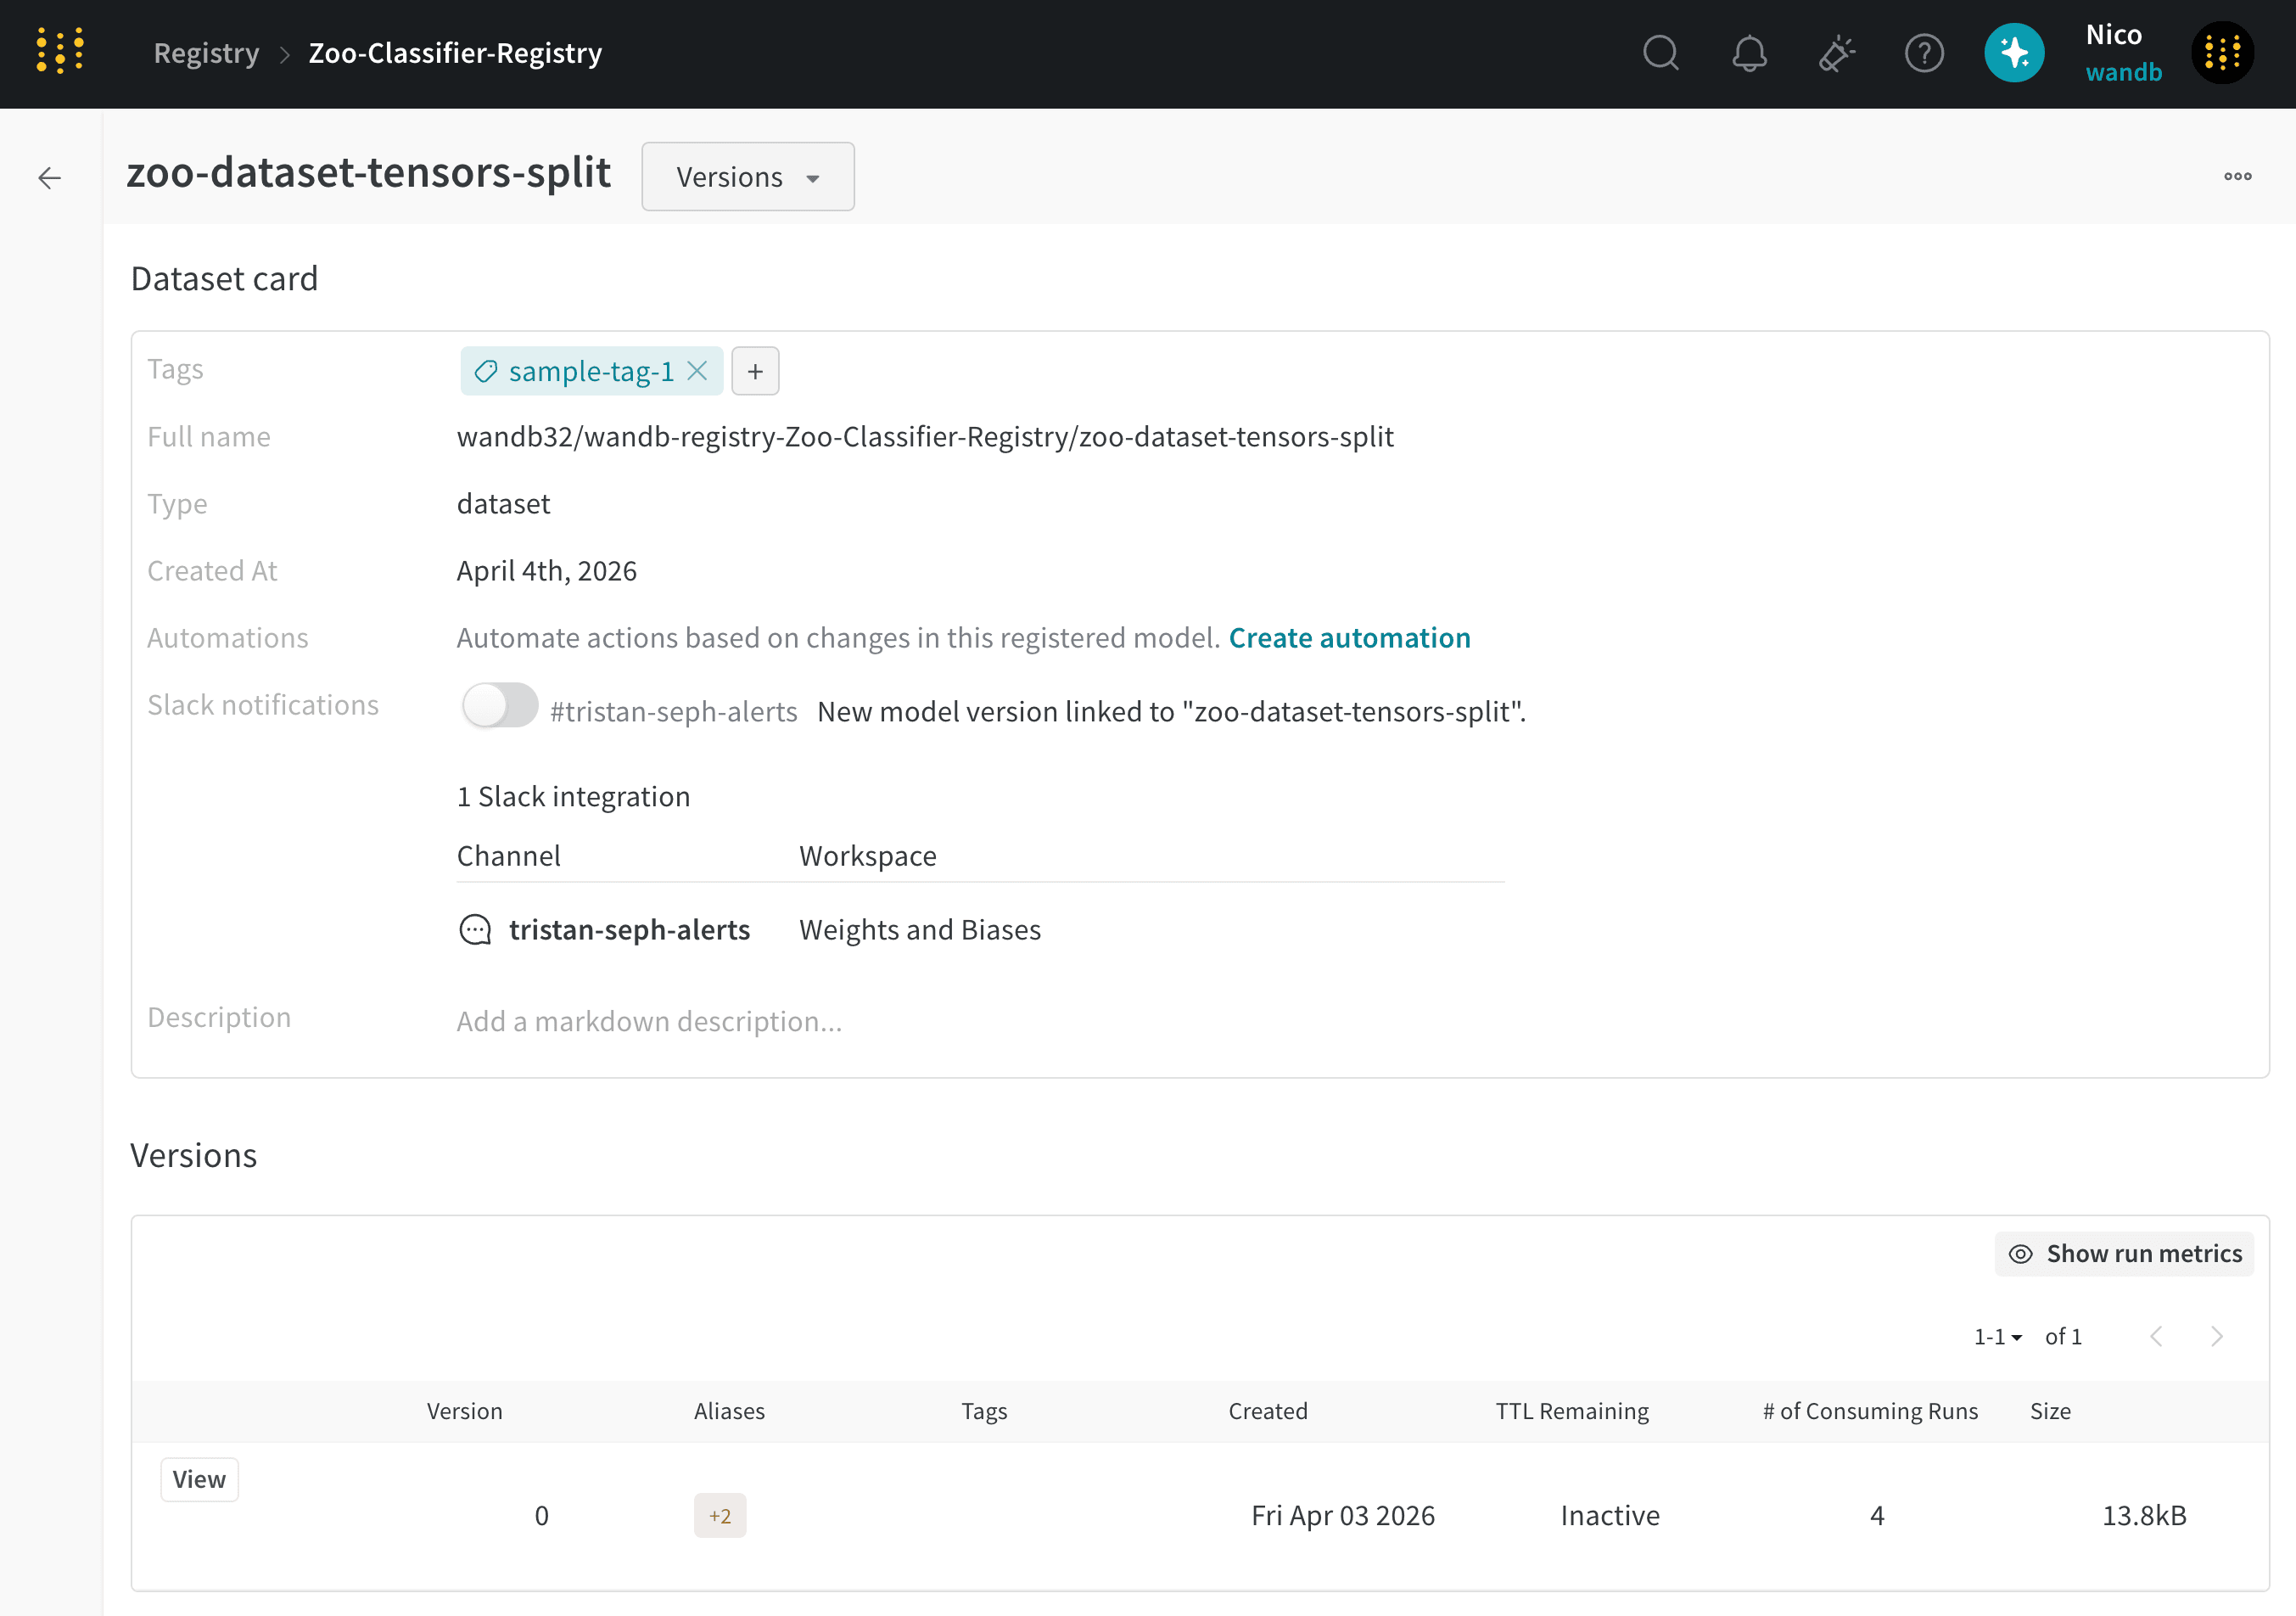 コレクションに追加されたタグは、そのコレクションの名の横にも表示されます。
たとえば、次の画像では、"sample-tag-1" というタグが "zoo-dataset-tensors-split" コレクションに追加されています。
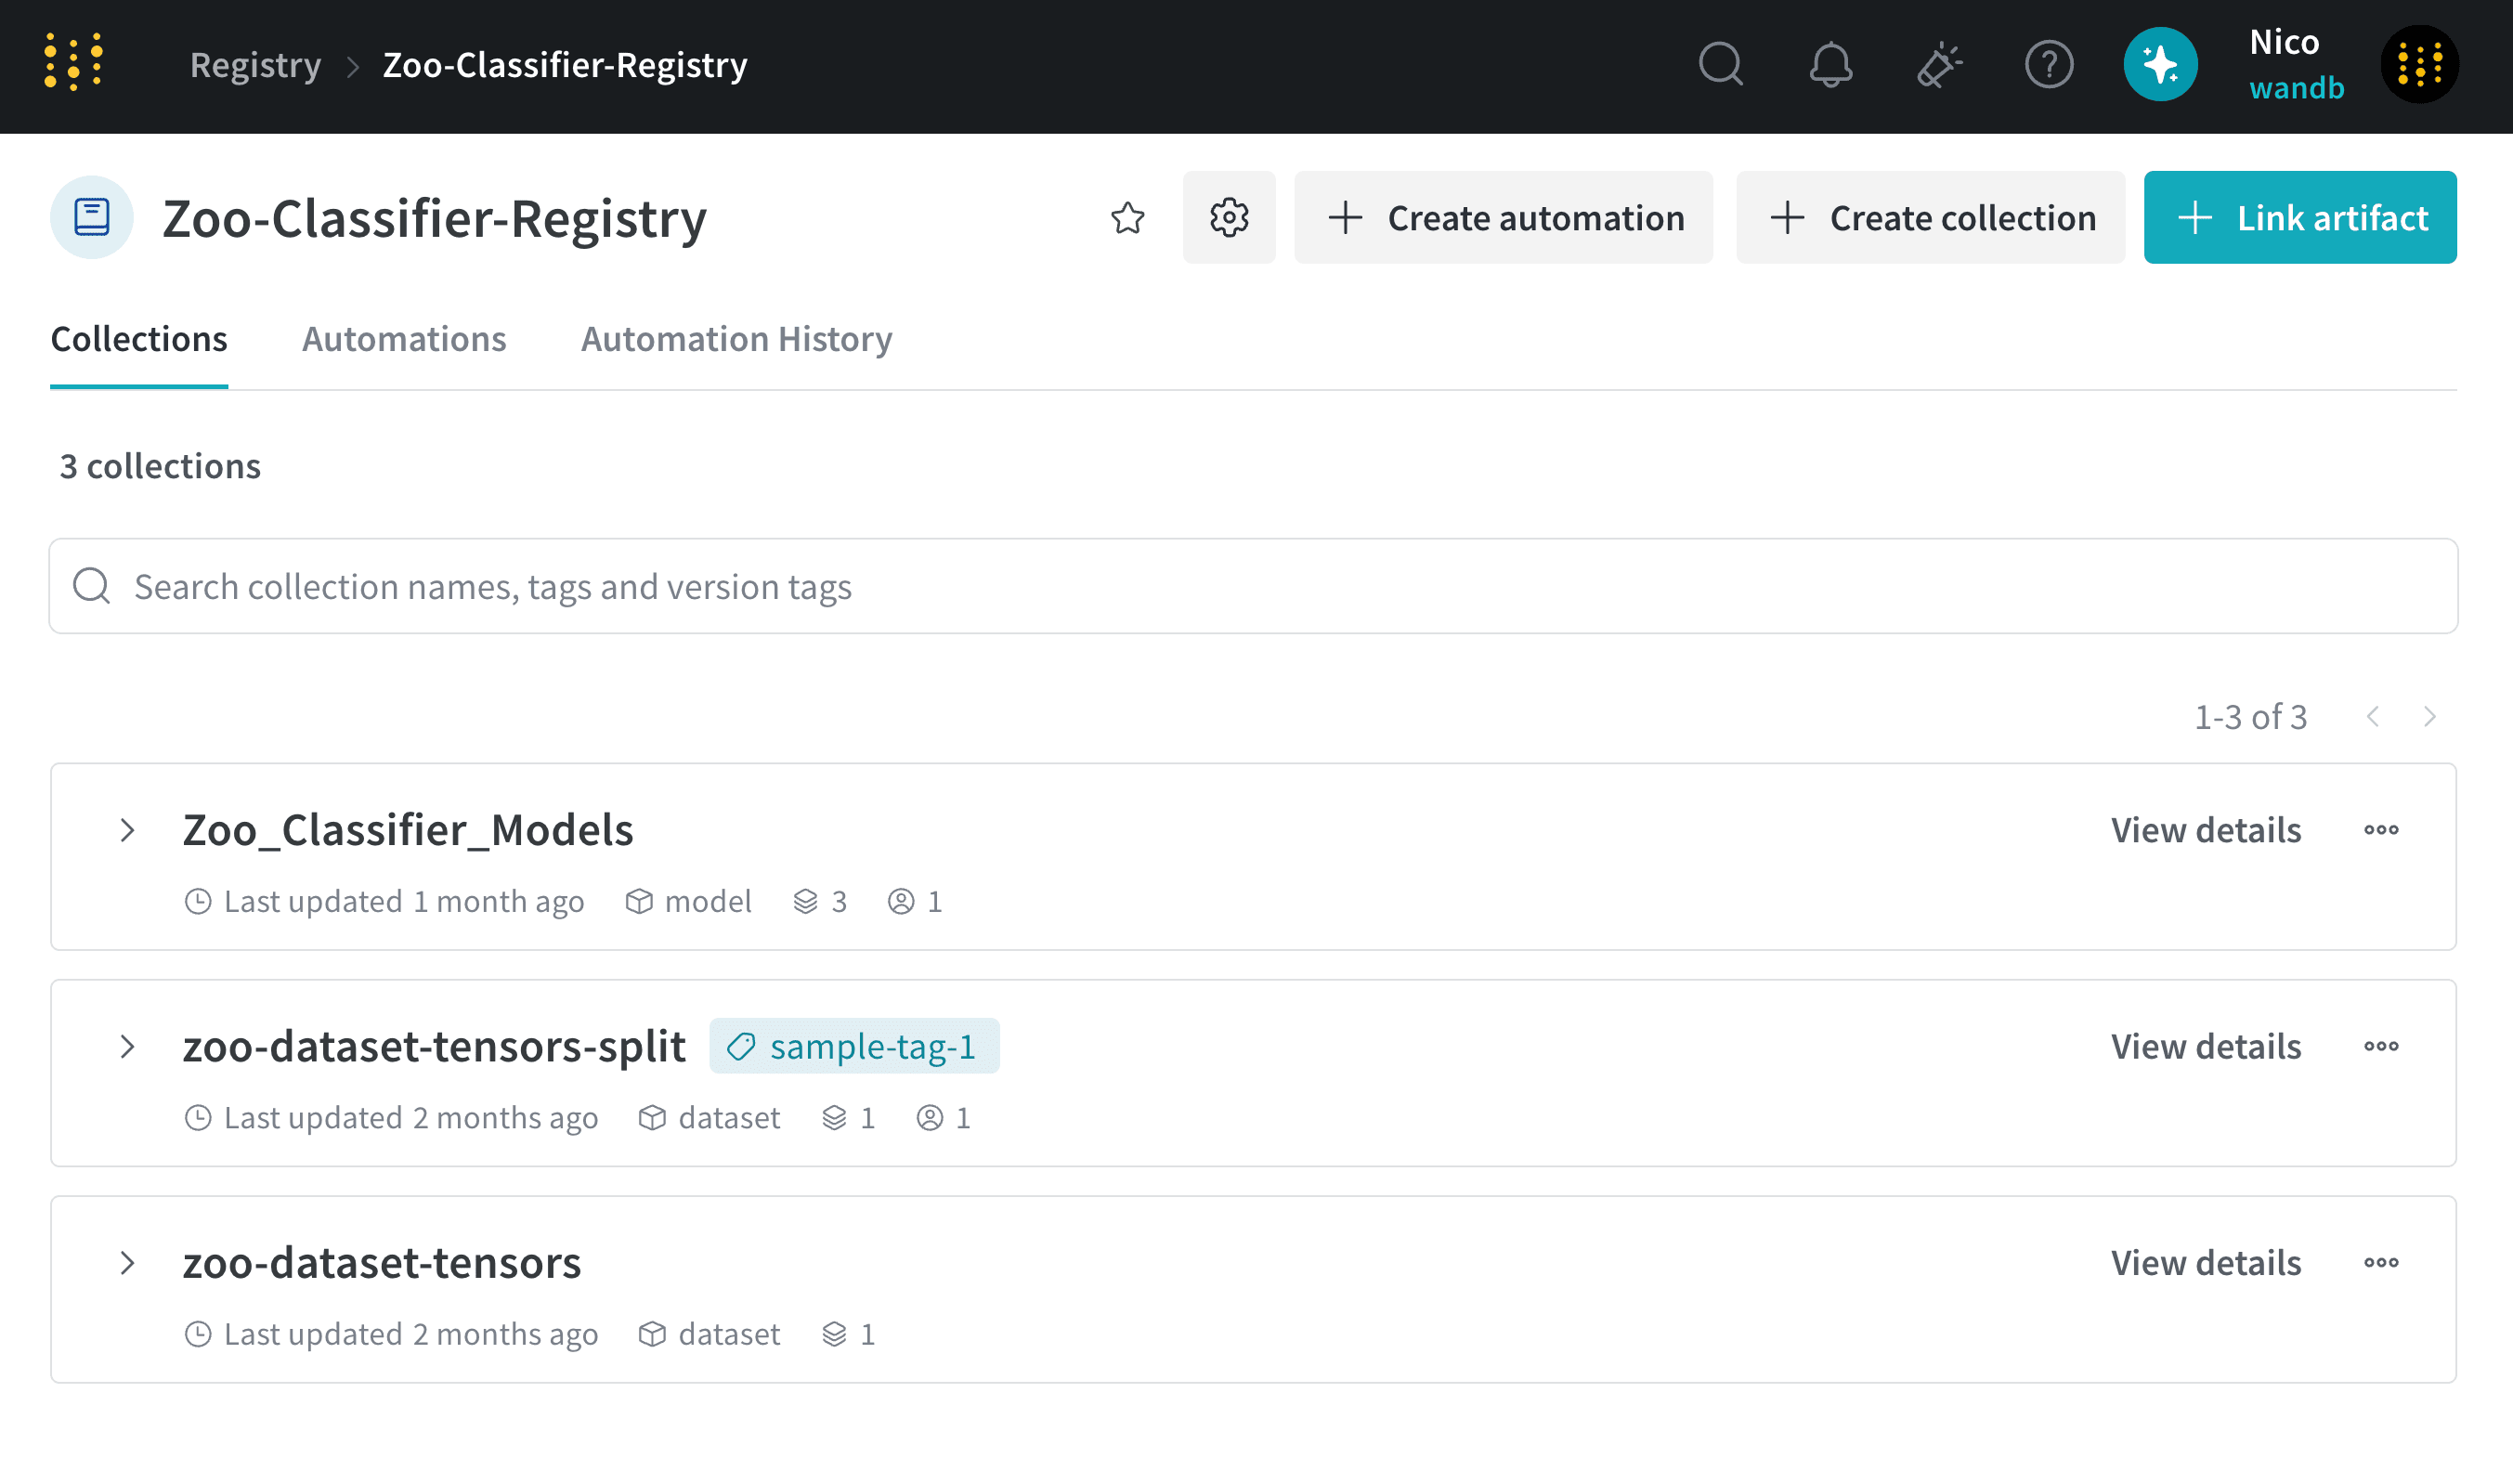
コレクションに追加されたタグは、そのコレクションの名の横にも表示されます。
たとえば、次の画像では、"sample-tag-1" というタグが "zoo-dataset-tensors-split" コレクションに追加されています。
## コレクションからタグを削除する
W\&B App UIを使用して、コレクションからタグを削除するには、次の手順に従います。
1. [W\&B Registry](https://wandb.ai/registry) にアクセスします。
2. レジストリカードをクリックします。
3. コレクションの名の横にある **View details** をクリックします。
4. コレクションカード内で、削除するタグの名にマウスカーソルを合わせます。
5. キャンセルボタン (**X** アイコン) をクリックします。
## artifact バージョンにタグを追加する
W\&B App UI または Python SDK を使用して、コレクション にリンクされた artifact バージョンにタグを追加します。
1. [https://wandb.ai/registry](https://wandb.ai/registry) で W\&B Registry にアクセスします。
2. レジストリカード をクリックします。
3. タグを追加する コレクション の名の横にある **View details** をクリックします。
4. **Versions** までスクロールします。
5. artifact バージョンの横にある **View** をクリックします。
6. **Version** タブ内で、**Tags** フィールドの横にあるプラスアイコン (**+**) をクリックし、タグ名を入力します。
7. キーボードの **Enter** キーを押します。
タグを追加または更新する artifact バージョンを取得します。artifact バージョンを取得したら、artifact object の `tag` 属性にアクセスして、その artifact のタグを追加または変更できます。artifact の `tag` 属性には、1 つ以上のタグをリストとして渡します。
他の artifact と同様に、run を作成せずに W\&B から artifact を取得することも、run を作成してその run 内で artifact を取得することもできます。いずれの場合も、W\&B サーバー上の artifact を更新するには、artifact object の `save` method を呼び出してください。
artifact バージョンのタグを追加または変更するには、以下の適切なコードセルをコピー&ペーストしてください。`<>` 内の値はご自身の値に置き換えてください。
以下の code snippet は、新しい run を作成せずに artifact を取得してタグを追加する方法を示しています。
```python title="新しい run を作成せずに artifact バージョンにタグを追加する" theme={null}
import wandb
ARTIFACT_TYPE = ""
REGISTRY_NAME = ""
COLLECTION_NAME = ""
VERSION = ""
artifact_name = f"wandb-registry-{REGISTRY_NAME}/{COLLECTION_NAME}:v{VERSION}"
artifact = wandb.Api().artifact(name = artifact_name, type = ARTIFACT_TYPE)
artifact.tags = ["tag2"] # 1 つ以上のタグをリストで指定します
artifact.save()
```
以下の code snippet は、新しい run を作成して artifact を取得し、タグを追加する方法を示しています。
```python title="run 中に artifact バージョンにタグを追加する" theme={null}
import wandb
REGISTRY_NAME = ""
COLLECTION_NAME = ""
VERSION = ""
with wandb.init(entity = "", project="") as run:
artifact_name = f"wandb-registry-{REGISTRY_NAME}/{COLLECTION_NAME}:v{VERSION}"
artifact = run.use_artifact(artifact_or_name = artifact_name)
artifact.tags = ["tag2"] # 1 つ以上のタグをリストで指定します
artifact.save()
```
## artifact バージョンに属するタグを更新する
タグをプログラムで更新するには、再代入するか、`tags` 属性を変更します。W\&B では、また Python のベストプラクティスとしても、インプレースで変更するのではなく、`tags` 属性を再代入することを推奨しています。
たとえば、次の code snippet は、再代入によって リスト を更新する一般的な方法を示しています。簡潔にするため、[artifact バージョンにタグを追加するセクション](#add-a-tag-to-an-artifact-version) のコード例の続きを使用します。
```python theme={null}
artifact.tags = [*artifact.tags, "new-tag", "other-tag"]
artifact.tags = artifact.tags + ["new-tag", "other-tag"]
artifact.tags = set(artifact.tags) - set(tags_to_delete)
artifact.tags = [] # すべてのタグを削除する
```
次の code snippet は、インプレースミューテーションを使用して artifact バージョンに属する タグ を更新する方法を示しています。
```python theme={null}
artifact.tags += ["new-tag", "other-tag"]
artifact.tags.append("new-tag")
artifact.tags.extend(["new-tag", "other-tag"])
artifact.tags[:] = ["new-tag", "other-tag"]
artifact.tags.remove("existing-tag")
artifact.tags.pop()
artifact.tags.clear()
```
## artifact バージョンに属するタグを表示する
W\&B App UI または Python SDK を使用して、registry にリンクされた artifact バージョンに属するタグを表示します。
1. [W\&B Registry](https://wandb.ai/registry) にアクセスします。
2. レジストリカード をクリックします。
3. タグを追加したい コレクション の名の横にある **View details** をクリックします。
4. **Versions** セクションまでスクロールします。
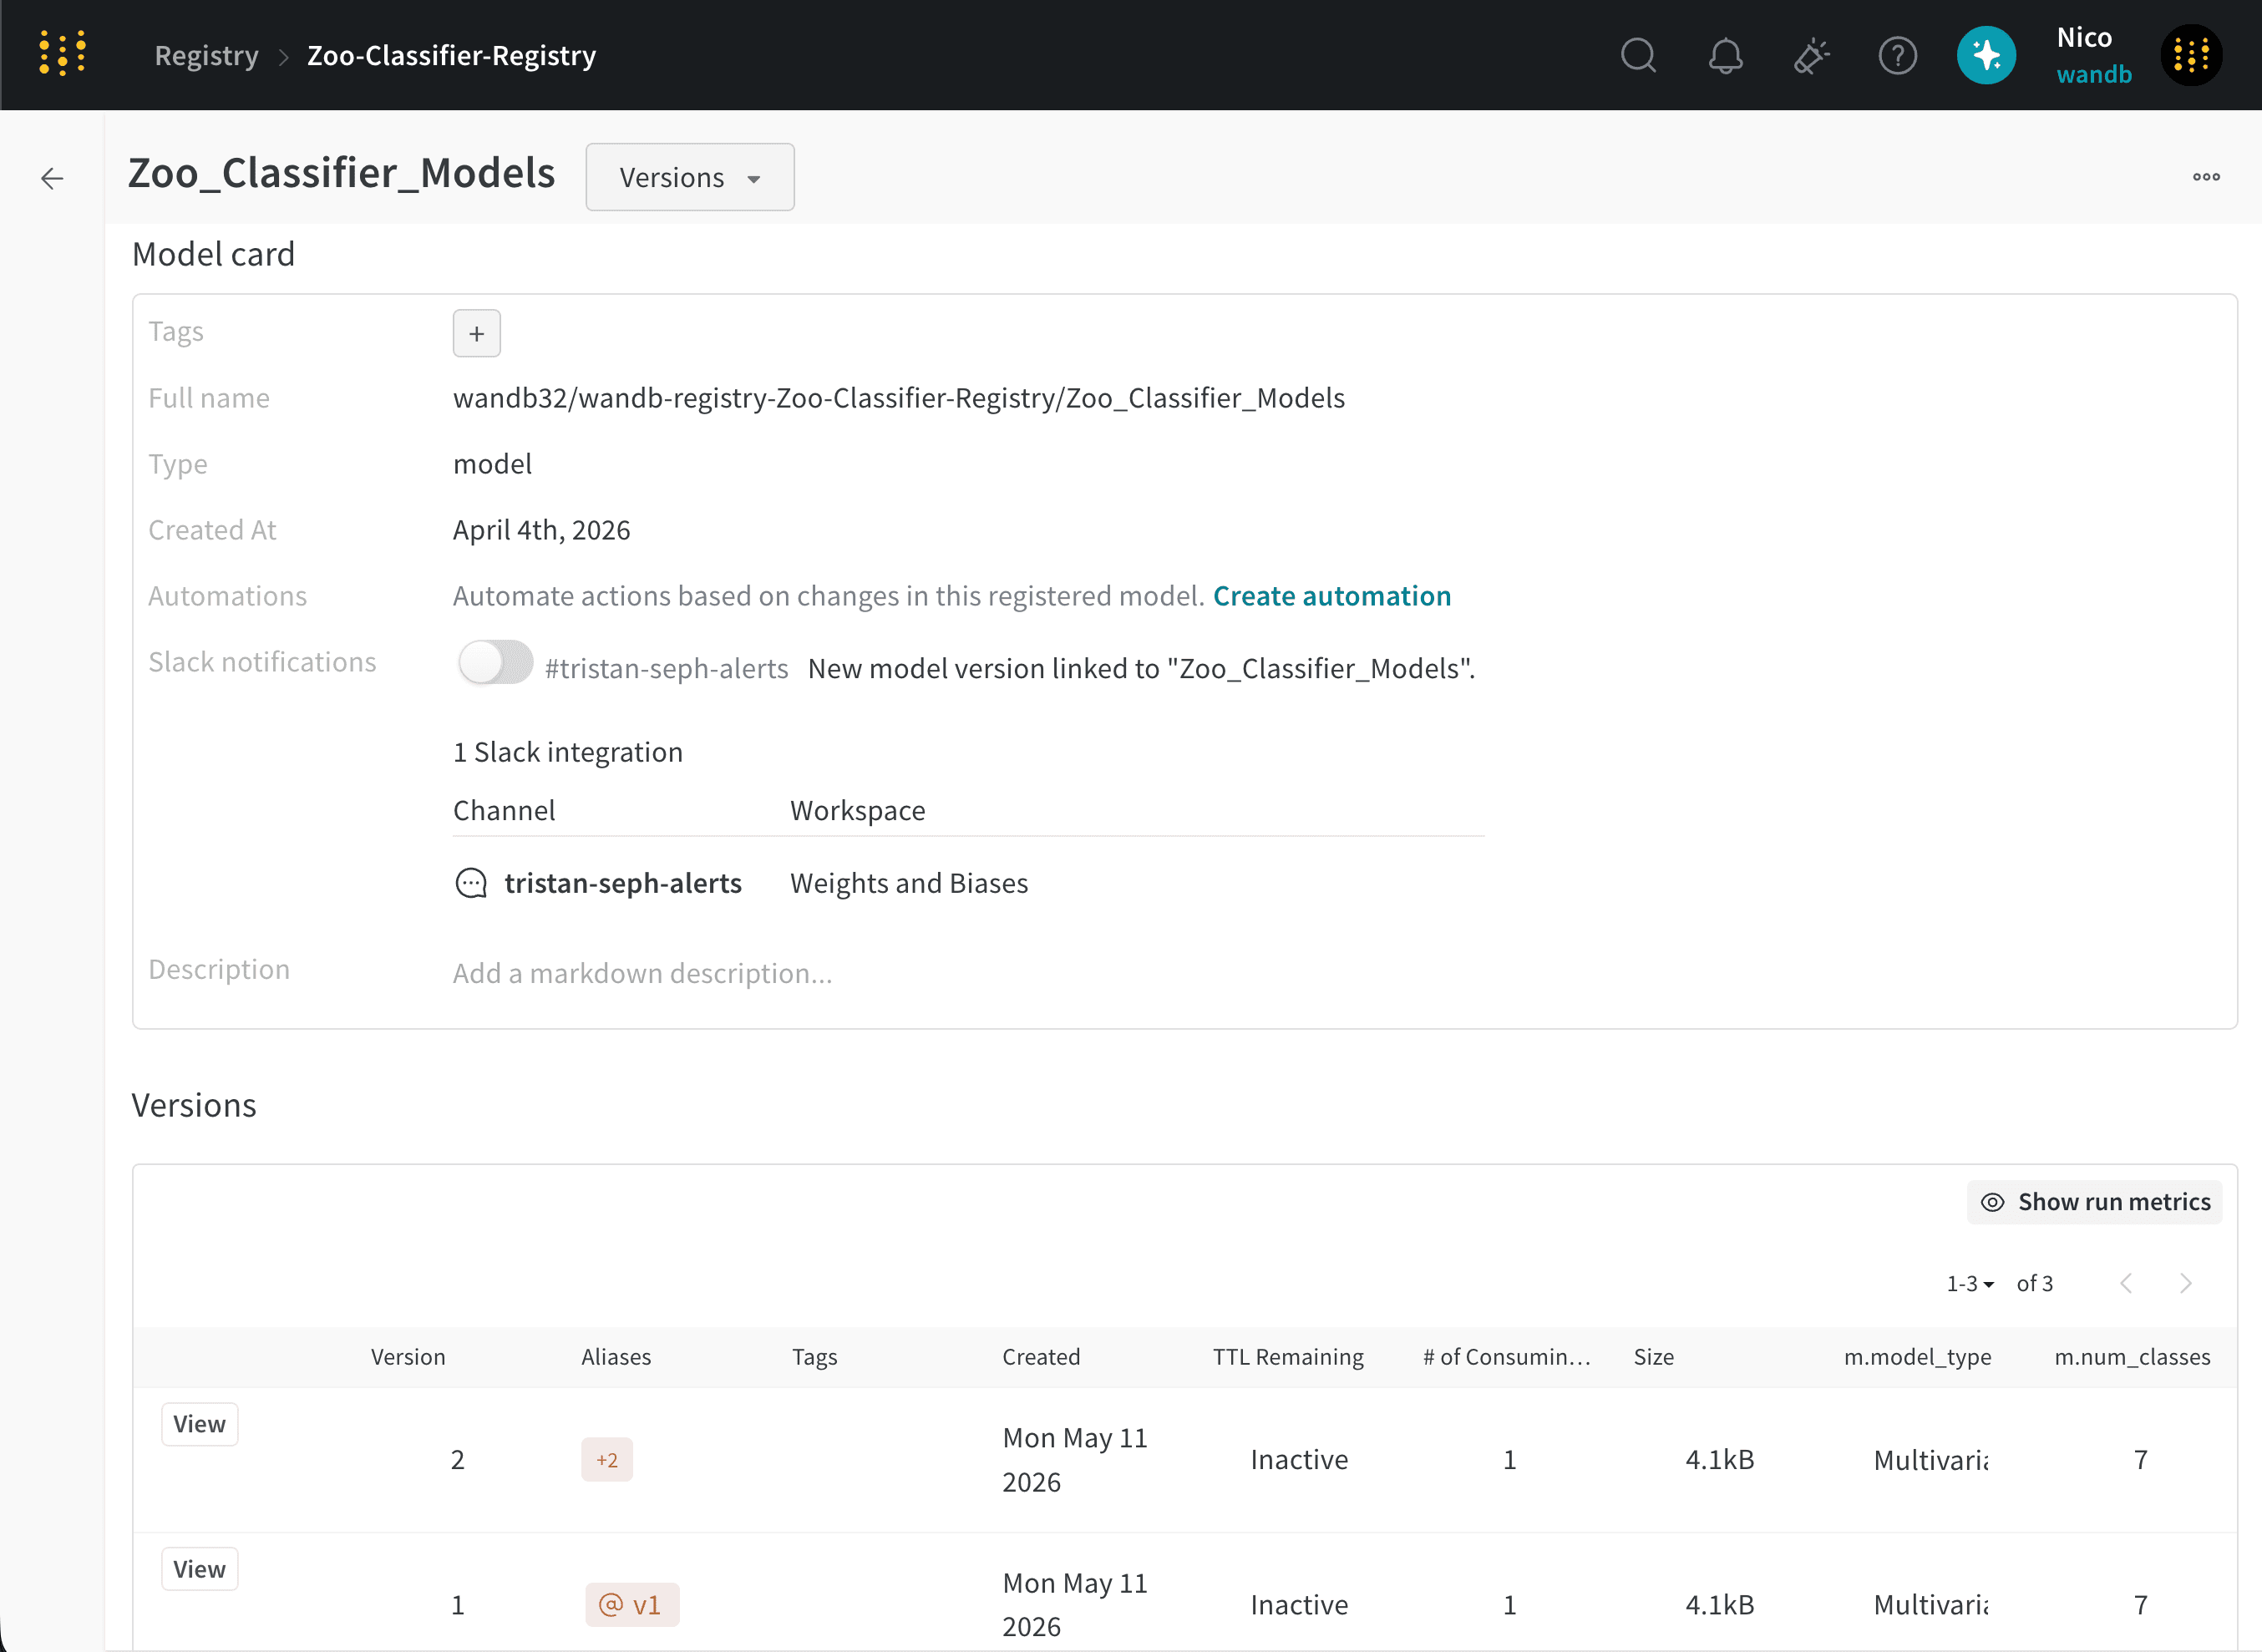
artifact バージョンに 1 つ以上のタグがある場合は、**Tags** 列でそれらのタグを確認できます。
 タグを表示するには、artifact バージョンを取得します。artifact バージョンを取得したら、artifact object の `tag` 属性を確認して、その artifact に属するタグを表示できます。
他の artifact と同様に、run を作成せずに W\&B から artifact を取得することも、run を作成してその run 内で artifact を取得することもできます。
以下の適切なコードセルをコピー&ペーストして、artifact バージョンのタグを追加または変更します。`<>` 内の値はご自身のものに置き換えてください。
次の code snippet は、新しい run を作成せずに artifact バージョンのタグを取得して表示する方法を示しています。
```python title="新しい run を作成せずに artifact バージョンにタグを追加する" theme={null}
import wandb
ARTIFACT_TYPE = ""
REGISTRY_NAME = ""
COLLECTION_NAME = ""
VERSION = ""
artifact_name = f"wandb-registry-{REGISTRY_NAME}/{COLLECTION_NAME}:v{VERSION}"
artifact = wandb.Api().artifact(name = artifact_name, type = artifact_type)
print(artifact.tags)
```
次の code snippet は、新しい run を作成して artifact バージョンのタグを取得して表示する方法を示しています。
```python title="run 中に artifact バージョンにタグを追加する" theme={null}
import wandb
REGISTRY_NAME = ""
COLLECTION_NAME = ""
VERSION = ""
with wandb.init(entity = "", project="") as run:
artifact_name = f"wandb-registry-{REGISTRY_NAME}/{COLLECTION_NAME}:v{VERSION}"
artifact = run.use_artifact(artifact_or_name = artifact_name)
print(artifact.tags)
```
タグを表示するには、artifact バージョンを取得します。artifact バージョンを取得したら、artifact object の `tag` 属性を確認して、その artifact に属するタグを表示できます。
他の artifact と同様に、run を作成せずに W\&B から artifact を取得することも、run を作成してその run 内で artifact を取得することもできます。
以下の適切なコードセルをコピー&ペーストして、artifact バージョンのタグを追加または変更します。`<>` 内の値はご自身のものに置き換えてください。
次の code snippet は、新しい run を作成せずに artifact バージョンのタグを取得して表示する方法を示しています。
```python title="新しい run を作成せずに artifact バージョンにタグを追加する" theme={null}
import wandb
ARTIFACT_TYPE = ""
REGISTRY_NAME = ""
COLLECTION_NAME = ""
VERSION = ""
artifact_name = f"wandb-registry-{REGISTRY_NAME}/{COLLECTION_NAME}:v{VERSION}"
artifact = wandb.Api().artifact(name = artifact_name, type = artifact_type)
print(artifact.tags)
```
次の code snippet は、新しい run を作成して artifact バージョンのタグを取得して表示する方法を示しています。
```python title="run 中に artifact バージョンにタグを追加する" theme={null}
import wandb
REGISTRY_NAME = ""
COLLECTION_NAME = ""
VERSION = ""
with wandb.init(entity = "", project="") as run:
artifact_name = f"wandb-registry-{REGISTRY_NAME}/{COLLECTION_NAME}:v{VERSION}"
artifact = run.use_artifact(artifact_or_name = artifact_name)
print(artifact.tags)
```
## artifact バージョンからタグを削除する
1. [W\&B Registry](https://wandb.ai/registry) にアクセスします。
2. レジストリカードをクリックします。
3. タグを追加する対象のコレクション名の横にある **View details** をクリックします
4. **Versions** までスクロールします
5. artifact バージョンの横にある **View** をクリックします
6. **Version** タブで、タグ名にマウスカーソルを合わせます
7. キャンセルボタン (**X** アイコン) をクリックします
## 特定のタグが付いたartifactバージョンを検索する
W\&B Python SDKを使用して、指定したタグのセットが付いたartifactバージョンを検索します。
```python theme={null}
import wandb
api = wandb.Api()
tagged_artifact_versions = api.artifacts(
type_name = "",
name = "",
tags = ["", ""]
)
for artifact_version in tagged_artifact_versions:
print(artifact_version.tags)
```